Posts

Showing posts from March, 2019

#PowerApps: Numeric Up/Down control with persisted button press event using components

Image
I just recently returned from the Microsoft MVP Global Summit 2019 where I had a chance to meet some of the top minds in the Microsoft PowerApps and Flow space. This was a truly exciting moment as I have been learning from the very same MVPs I met - yes, we do learn from each other! In one of my hallway discussions, I ran into my buddy Mehdi Slaoui Adaloussi , Principal Program Manager at Microsoft, who I first met at Microsoft Build 2018. I had read Mehdi's recent article on reusable components and, in particular, that I had been playing with his version of the Numeric Up/Down Control. See 10 Reusable Components: tab control, calendar, dialog box, map control and more . I must start by saying that the components Mehdi put in place expose some very clever implementation techniques, so I highly recommend you download the msapp files and load them up in your environment and study them. The Numeric Up Down control in particular, caught my attention as it required multiple and

#MSDYNGP: Named Printers and Redirected Printers in RDP environments

Image
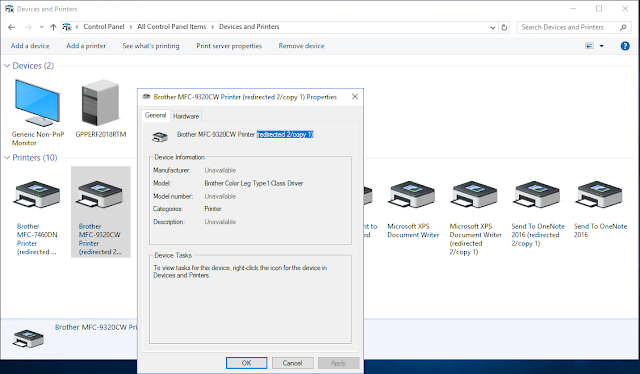
A lot of the guiding principles for deploying Named Printers in a Terminal Server or Citrix environment comes from two of my favorite articles, written by my good friend and fellow Microsoft Business Applications MVP, David Musgrave  (twitter: @winthropdc ). David happens to be the creator of Named Printers and probably understands the product better than anyone I know. You can read his articles here: Using Named Printers with Terminal Server Using Named Printers with Terminal Server Revisited These articles continue to be very relevant if you are in an environment where a Print (or Printer) server is the norm and published printers are standard. Print servers are used to interface printers with devices in a network, but mostly to standardize administrative policies, and balance the document load that printers can manage. Part of the standardization is to ensure printers are uniquely identified across the networks, regardless of whether you are accessing the network remotely or ph

#PowerApps: Using Components to create a Digital Clock - Part 2

Image
In Part 1 of this series, you saw how my first version of the digital clock went. Although it got the job done, it was plagued with repetitive code, repetitive controls, and over saturation of variables, which in turn rendered the application hard to follow, and worse yet, affected performance. In this article, I will show how to use PowerApps Components  to promote reusability and decrease the code footprint. Components is currently a preview feature, hence word of caution when using them as you may need to retest your app once it becomes generally available. The previous experience showed us that we can save time and code by creating a component to be used for the digits of the clock. This digit component could then be enhanced by allowing the developer to pass in the digit to be displayed and the foreground and background colors the segments - all set up as custom properties to the component - as shown here: We have also added code for each of the segments that will bring

#PowerApps: Using Components to create a Digital Clock - Part 1

Image
Building a Digital Clock the traditional way When I first set out to build a digital clock with night mode, I figured I was just going to start from what I know. Each digit of the clock is composed for 7 segments and each segment would behaves in a binary way based on the number that it needs to display. To create each segment, I would use a Rectangle from the Icons gallery. Since I initially set out to add 3 digits to the clock - two to display seconds, and 1 to display minutes - this would require a whopping 21 rectangles, plus 2 for the blinking dots to bring the total rectangles to 23. Controlling each digit required the use of 3 timers. Each timer would have to evaluate a value to determine which segments to display. For the right most digit, the following code is used for the timer, Timer1 : Timer1 OnTimerStart() Select(Button1) Timer1 OnTimerEnd() UpdateContext({MyCounter: MyCounter + 1}); If ( MyCounter > 9, UpdateContext({MyCounter: 0}), false )