Changing SQL Server views for SmartList Builder smartlists
One of the valuable tools that Microsoft has released is SmartList Builder for Dynamics GP. The concept is very simple: if the standard out-of-the-box Smartlist does not cut it for you, well, you build your own! Furthermore, SmartList Builder does allow for some nifty stuff, such as working with Microsoft SQL Server views and (custom) tables. Custom tables are not the focus of this article.
If you can't get your smartlist done with all the SmartList Builder query building capabilities, then create your own views of the data in Microsoft SQL Server, grant access to them in SQL Server, then, grant security to them in SLB, and use them.
But what if after deploying your smartlists, users request more columns of information that you did not include in your original SQL Server views, and now you need to make those changes and affect your previous work of art?
Solution
The solution may be easier than you think, but please do not delete your existing SmartList Builder and recreate all that work again! It's not necessary! These simple steps will illustrate how to change your SQL Server views and make these changes affect your existing SmartList Builder objects.
1) First, create your SQL Server view (If you already have a view skip to step 5), i.e:
NOTE: This is a trivial example to illustrate the solution. Views should and must be used when you have exhausted all possibilities in SmartList Builder.
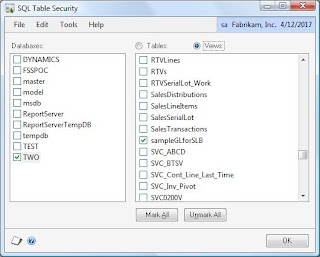
2) Grant security to the new object in SmartList Builder in GP. Go to Microsoft Dynamics GP > Tools > SmartList Builder > Security > SQL Table Security

3) Create a smartlist with the new view, marked all columns in the Default list
4) Build the smartlist by going to Microsoft Dynamics GP > SmartList. Click on Yes to build SmartList.
5) Now, go back to SQL Server Management Studio and add a new column to the view, as follows:
NOTE: In this case I added the CRDTAMNT (credit amount) column.
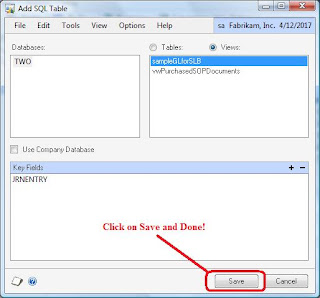
6) Go back to SmartList Builder, open the smartlist and click on the Edit Selected Table button to open the Add SQL Table window.

All that's needed is to click on the Save button, nothing else! Surprisingly, this is not documented anywhere in the manuals. Now the CRDTAMNT column shows up in the fields list on the right pane. Then click on the Default check mark to add to the default list of columns to be displayed, or manually add the column in your smartlist after rebuilding with the changes.
7) Now, click on the Save button in the SmartList Builder window.
8) Open SmartList to build the modified smartlist with the new changes.
Hope these simple steps help you with modifying your views and getting your SmartList Builders to work smoothly with the changes.
Until next post!
MG.-
Mariano Gomez, MIS, PMP
Maximum Global Business, LLC
http://www.maximumglobalbusiness.com/
If you can't get your smartlist done with all the SmartList Builder query building capabilities, then create your own views of the data in Microsoft SQL Server, grant access to them in SQL Server, then, grant security to them in SLB, and use them.
But what if after deploying your smartlists, users request more columns of information that you did not include in your original SQL Server views, and now you need to make those changes and affect your previous work of art?
Solution
The solution may be easier than you think, but please do not delete your existing SmartList Builder and recreate all that work again! It's not necessary! These simple steps will illustrate how to change your SQL Server views and make these changes affect your existing SmartList Builder objects.
1) First, create your SQL Server view (If you already have a view skip to step 5), i.e:
/* Mariano Gomez, MVP
   Sample code to illustrate changes in SQL Server view-based smartlist
*/
IF OBJECT_ID('dbo.querySomething') IS NOT NULL
   DROP VIEW dbo.querySomething
GO

CREATE VIEW dbo.querySomething AS
SELECT JRNENTRY, TRXDATE, ACTINDX, DEBITAMT from GL20000
GO

GRANT SELECT ON dbo.querySomething TO DYNGRP
GO
NOTE: This is a trivial example to illustrate the solution. Views should and must be used when you have exhausted all possibilities in SmartList Builder.
2) Grant security to the new object in SmartList Builder in GP. Go to Microsoft Dynamics GP > Tools > SmartList Builder > Security > SQL Table Security

3) Create a smartlist with the new view, marked all columns in the Default list
4) Build the smartlist by going to Microsoft Dynamics GP > SmartList. Click on Yes to build SmartList.
5) Now, go back to SQL Server Management Studio and add a new column to the view, as follows:
/* Mariano Gomez, MVP
   Sample code to illustrate changes in SQL Server view-based smartlist
*/
ALTER view [dbo].[sampleGLforSLB] AS
SELECT JRNENTRY, TRXDATE, ACTINDX, DEBITAMT, CRDTAMNT from GL20000
GO
NOTE: In this case I added the CRDTAMNT (credit amount) column.
6) Go back to SmartList Builder, open the smartlist and click on the Edit Selected Table button to open the Add SQL Table window.

All that's needed is to click on the Save button, nothing else! Surprisingly, this is not documented anywhere in the manuals. Now the CRDTAMNT column shows up in the fields list on the right pane. Then click on the Default check mark to add to the default list of columns to be displayed, or manually add the column in your smartlist after rebuilding with the changes.
7) Now, click on the Save button in the SmartList Builder window.
8) Open SmartList to build the modified smartlist with the new changes.
Hope these simple steps help you with modifying your views and getting your SmartList Builders to work smoothly with the changes.
Until next post!
MG.-
Mariano Gomez, MIS, PMP
Maximum Global Business, LLC
http://www.maximumglobalbusiness.com/
Comments
Thank you so much for documenting this - very useful to have this as a reference.
-Victoria
Thanks for the input! :-)
MG.-
Mariano Gomez, MVP.
A big thank you for showing me the way for building complex Smartlist. I never had to dig into SL based on SQL views and your post has been very helpfull.
Julien
I have created a Smartlist in SB which uses a SQL Table (which I learned how to do from another post of yours in KB, thank you very much!) but now have encountered a problem. My Smartlist works just fine until I attempt to "Search" in Smartlist using parameters restricting a specific column from the SQL table. The data in the column happens to be Date/Time information. (For example: DEX_ROW_TS is equal to 7/29/2011.)Of course, SQL is returning the number of days from 1/1/1900 and simply displaying that number as a date. When users actually enter a date in the Search parameters, there are no records returned since there parameters would exclude that string of numerals. Any thoughts on how to convert the SQL data from that column into a Smartlist searchable Date? Your help is often used and much appreciated!
If I understand correctly, your view includes the DEX_ROW_TS column and SmartList is not doing the correct conversion on the date.
Try this in your view:
CONVERT(datetime, CONVERT(varchar(20), DEX_ROW_TS, 101)) AS DEX_ROW_TS
I was wondering if there was any way to tell what tables are feeding the smartlists in GP. We do not have builder becuase I work for really cheap people. So what they do is create a smartlist then want me to reverse engineer it and build a view. So i was hoping to find out what tables are avalable in to smartlist-invnetory-item quantitys.
thanks
Vic
Thanks
Vic