Getting Started with VST: WinForms and Controls - Part 1
If you have been around Microsoft Dexterity long enough, by now you are already aware that Dex is not an object oriented development environment, and rather supports a concept called object-based development. In the traditional sense, Dexterity does not allow you to define classes and derive objects from those classes. However, someone figured out that a Dexterity form can act as a container or class, with the Scripts and Functions tabs allowing you to define the contructors, destructors and methods for the class. In addition, adding fields to a window and setting the proper values for those fields allows developers to set the state of an object. Given the nature of the form and how the scripts on that form are called, and the values for fields on windows are set, forms can simulate classes with public and private methods in traditional object oriented programming terms.
Thank goodness, you don't need to do all this in Visual Studio! VST allows you to define a WinForm, or in simple terms, a Windows Form. Forms in VST cannot be grouped as you would normally do in Dexterity, so in that sense, they behave like typical Dexterity window, but they still provide all the functionality, including the look and feel due to the inherited properties created with the Dexterity Bridge assembly.
Customer Hobbies WinForm
Our example today, will show how to add the equivalent of a Dexterity form trigger, known in VST as a menu handler event. Typically, form triggers add an entry to the Additional menu on a Dexterity form. Today, we will add a Customer Hobbies form and will then add a menu handler event to the Customer Maintenance form to call our form.
1) Open Visual Studio. Go to File > New > Project to create a new Visual Studio project.
2) Find the Dynamics GP in the Project Types pane, then choose Microsoft Dynamics GP Add-In from the installed templates pane.
3) Enter a name for the project. We will be naming our project GPWinForm.
4) Click OK to continue
5) Make sure your GPAddIn.cs code looks like this:
GPAddIn.cs
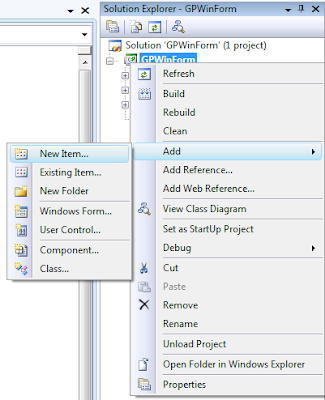
6) We will first define our WinForm. In Solution Explorer, right-click on the project name and navigate to Add > New Item as shown in the figure below.
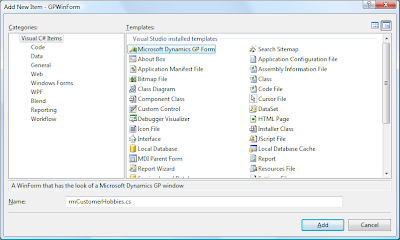
7) In the Add New Item window we will highlight Microsoft Dynamics GP Form and name our form rmCustomerHobbies.cs. Click on Add to continue.
8) Here comes VST into play! When the form is defined, you will notice a set of providers at the bottom of the design window, as shown below.
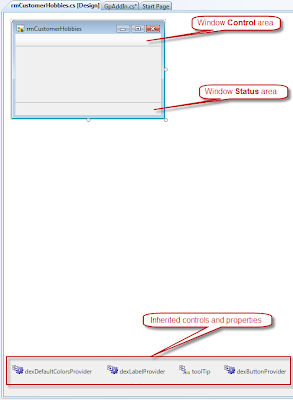
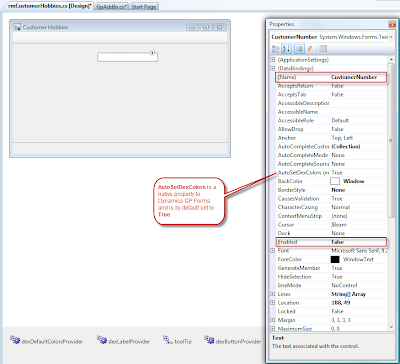
These providers allow WinForms and certain controls to inherit properties unique to Dexterity windows and controls. In the example, our WinForm is given a Control area and a Status area by default. To change the window title, locate the Text property in the Properties window and edit to Customer Hobbies.
9) Now, let's add some controls -- you will need to resize your window accordingly. We will add a few prompts (known as labels in Visual Studio) and a few strings (known as text boxes in Visual Studio). First our text boxes:
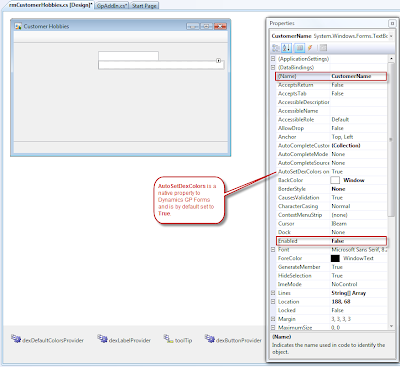
a) Click on the TextBox control in the Toolbox. We will add the CustomerNumber field. Set the properties for the field as follow:
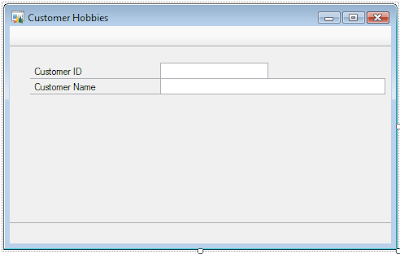
b) Now, let's add the CustomerName field. We can follow the same steps used in (a). At the end your window should look like this:
In traditional Dexterity style, these two fields will inherit the values displayed in the Customer Maintenance window when a record is selected and the Customer Hobbies window is selected.
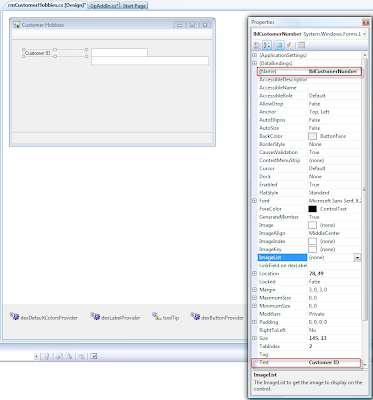
10) Now we can add the labels that will identify our fields when the window is opened. We will add the Customer ID and Customer Name labels, but most importantly, show how you can link fields to their prompts as well, just like in Dexterity.
a) Click on the Label control in the Toolbox. Now place the label in from of the CustomerNumber field. Size the label accordingly and align accordingly. Set the label properties as follow:
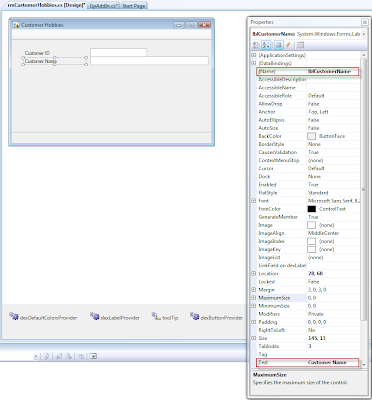
NOTE: Unlike Dexterity, label controls are referenciable via code, hence the Name property of the control.
b) Repeat step (a) for the Customer Name label and set the propeties as well.
11) Now let's proceed to link the fields to their prompts. One of the properties unique to VST label controls is the LinkField on dexLabelProvider. This property will display a drop-down list that will allow you to select the corresponding window field for the label, as shown below:
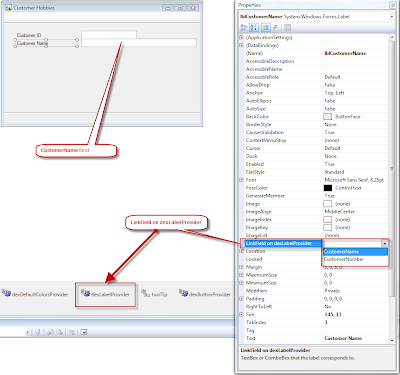
Once a label is linked to a textbox, you will see the traditional underline that accompanies all Dexterity prompts.
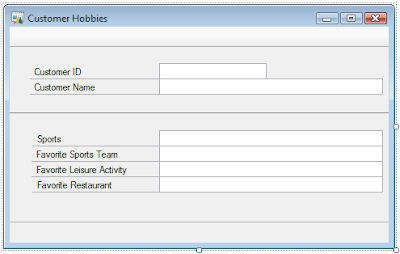
12) Following the same guidelines, we will add 4 more text boxes, rmCustomerSports, rmCustomerSportsTeam, rmCustomerLeisureActivity, and rmCustomerRestaurant, and the corresponding labels to indicate the customer's hobbies. Note that the Enabled property for these new controls must be set to True to allow the controls to receive data. We will also use an empty label from the Toolbox to create the separator between the window's static section and the data entry section, a la Dexterity. Your final window should look like this -- don't worry if you did not get the same results, I have uploaded the solution for your benefit.
Part 2 of the "WinForms and Controls" series will discuss adding the typical buttons to the screen, like the Ok button, the window help button and the window notes buttons. In addition to the code needed to produce the menu handler event.
Downloads
GPWinForm Solution - click here.
Until next post!
MG.-
Mariano Gomez, MVP
Maximum Global Business, LLC
http://www.maximumglobalbusiness.com/
Updates to this article
08/07/2009 - Fixed broken link to solution download.
Thank goodness, you don't need to do all this in Visual Studio! VST allows you to define a WinForm, or in simple terms, a Windows Form. Forms in VST cannot be grouped as you would normally do in Dexterity, so in that sense, they behave like typical Dexterity window, but they still provide all the functionality, including the look and feel due to the inherited properties created with the Dexterity Bridge assembly.
Customer Hobbies WinForm
Our example today, will show how to add the equivalent of a Dexterity form trigger, known in VST as a menu handler event. Typically, form triggers add an entry to the Additional menu on a Dexterity form. Today, we will add a Customer Hobbies form and will then add a menu handler event to the Customer Maintenance form to call our form.
1) Open Visual Studio. Go to File > New > Project to create a new Visual Studio project.
2) Find the Dynamics GP in the Project Types pane, then choose Microsoft Dynamics GP Add-In from the installed templates pane.
3) Enter a name for the project. We will be naming our project GPWinForm.
4) Click OK to continue
5) Make sure your GPAddIn.cs code looks like this:
GPAddIn.cs
using System;
using System.Collections.Generic;
using System.Text;
using Microsoft.Dexterity.Bridge;
using Microsoft.Dexterity.Applications;
using Microsoft.Dexterity.Applications.DynamicsDictionary;

namespace GPWinForm
{
    public class GPAddIn : IDexterityAddIn
    {
        // IDexterityAddIn interface

        public void Initialize()
        {

        }
    }
}
6) We will first define our WinForm. In Solution Explorer, right-click on the project name and navigate to Add > New Item as shown in the figure below.

7) In the Add New Item window we will highlight Microsoft Dynamics GP Form and name our form rmCustomerHobbies.cs. Click on Add to continue.

8) Here comes VST into play! When the form is defined, you will notice a set of providers at the bottom of the design window, as shown below.

These providers allow WinForms and certain controls to inherit properties unique to Dexterity windows and controls. In the example, our WinForm is given a Control area and a Status area by default. To change the window title, locate the Text property in the Properties window and edit to Customer Hobbies.
9) Now, let's add some controls -- you will need to resize your window accordingly. We will add a few prompts (known as labels in Visual Studio) and a few strings (known as text boxes in Visual Studio). First our text boxes:
a) Click on the TextBox control in the Toolbox. We will add the CustomerNumber field. Set the properties for the field as follow:

b) Now, let's add the CustomerName field. We can follow the same steps used in (a). At the end your window should look like this:

In traditional Dexterity style, these two fields will inherit the values displayed in the Customer Maintenance window when a record is selected and the Customer Hobbies window is selected.
10) Now we can add the labels that will identify our fields when the window is opened. We will add the Customer ID and Customer Name labels, but most importantly, show how you can link fields to their prompts as well, just like in Dexterity.
a) Click on the Label control in the Toolbox. Now place the label in from of the CustomerNumber field. Size the label accordingly and align accordingly. Set the label properties as follow:

NOTE: Unlike Dexterity, label controls are referenciable via code, hence the Name property of the control.
b) Repeat step (a) for the Customer Name label and set the propeties as well.

11) Now let's proceed to link the fields to their prompts. One of the properties unique to VST label controls is the LinkField on dexLabelProvider. This property will display a drop-down list that will allow you to select the corresponding window field for the label, as shown below:

Once a label is linked to a textbox, you will see the traditional underline that accompanies all Dexterity prompts.

12) Following the same guidelines, we will add 4 more text boxes, rmCustomerSports, rmCustomerSportsTeam, rmCustomerLeisureActivity, and rmCustomerRestaurant, and the corresponding labels to indicate the customer's hobbies. Note that the Enabled property for these new controls must be set to True to allow the controls to receive data. We will also use an empty label from the Toolbox to create the separator between the window's static section and the data entry section, a la Dexterity. Your final window should look like this -- don't worry if you did not get the same results, I have uploaded the solution for your benefit.

Part 2 of the "WinForms and Controls" series will discuss adding the typical buttons to the screen, like the Ok button, the window help button and the window notes buttons. In addition to the code needed to produce the menu handler event.
Downloads
GPWinForm Solution - click here.
Until next post!
MG.-
Mariano Gomez, MVP
Maximum Global Business, LLC
http://www.maximumglobalbusiness.com/
Updates to this article
08/07/2009 - Fixed broken link to solution download.


Comments
How did you make the label become that line?
Thanks again