Transferring Extender customizations from one company database to another
Today, we will explore two methods for transferring Extender customizations between company databases.
Method 1: Extender's Export/Import functionality
Extender offers a native method for transferring customizations between company databases with the following steps:
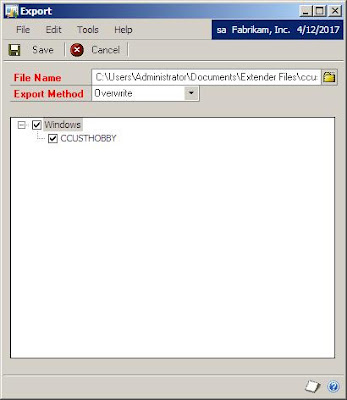
1. Open Extender's Export window. Go to Microsoft Dynamics GP > Tools > Extender > Export.

a) Click on the Folder button to select the path and enter the file name for your export. Hint: try to use the name of the customization being exported as the file name.
b) Select the customization(s) to be exported by clicking on each of the objects.
2. Click Save to continue. This will create the XML export file with the customizations.
3. Switch companies in Dynamics GP. Click the Company Name on the Status bar and select the company where you would like to import the customizations into from the Company drop-down list. Click the OK button to continue.
4. Open Extender's Import window. Go to Microsoft Dynamics GP > Tools > Extender > Import.
a) Click on the Folder button and select the file previously exported in steps 1 and 2.
b) Click on the Import button to continue. This action will read the XML file and build the customizations in your target company database.
Method 2: Support Debugging Tool
That's right! You can also use Support Debugging Tools' XML Table Export and XML Table Import capabilities. With the aid of the sampling scripts presented in my previous post you should be well on your way to identify the tables that contain data. Once you have identified them, you can now use Support Debugging Tool to extract the data into an XML file from your source company database.
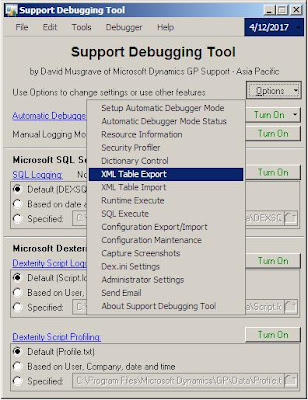
1. Open Support Debugging Tool's XML Table Export window. Click on the Options button, then select XML Table Export.

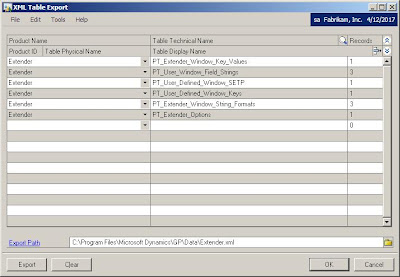
2. In the Export window, select the tables to be exported.

3. Switch companies in Dynamics GP. Click the Company Name on the Status bar and select the company where you would like to import the customizations into from the Company drop-down list. Click the OK button to continue.
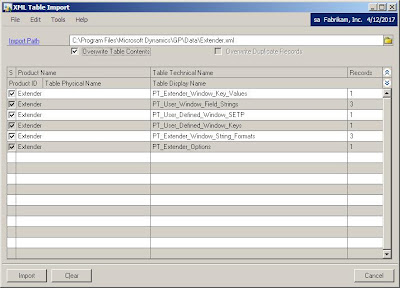
4. Open Support Debugging Tool's XML Table Import window. Click on the Options button, then select XML Table Import.
5. In the Import window, select the file to be imported.

Now, click on the import button and you are done!
Extender allows users to perform easy customizations in their Dynamics GP system with just a few clicks or with minimum assistance from a developer. It's time to harness the power of the tool. I will continue to explore other functions available to Extender user throughout the coming days.
Until next post!
MG.-
Mariano Gomez, MVP
Maximum Global Business, LLC
http://www.maximumglobalbusiness.com/
Comments
From the Microsoft Dynamics GP Blogs: Quickbooks Migration Update; Public Sector Industry Fact Sheet; the Value of Excel Reports; and How to Leverage Extender
http://msdynamicsworld.com/story/accounting/microsoft-dynamics-gp-blogs-quickbooks-migration-update-public-sector-industry-fact