Workshop Day 2 - Setting up the VBA project
Welcome to the second day of our Modifier with Visual Basic for Applications (VBA) workshop!
Today we will dive into adding objects (windows and fields) to VBA. This will set us one step closer to our final project. We will also be adding our first lines of code. Today's workshop will cover the following topics:
In the previous session we added some extra controls (a field, a lookup button, and a zoom button) to the Equipment Maintenance window. We also explored linking the field to its prompt and the lookup to its field. This is especially important if we want to provide some extra capabilities to our project. After all, you never know who will customize our customization. For more information check my previous article "The importance of linking your fields to their prompts.
ADDING WINDOWS AND FIELDS TO VBA
For our project, we will need to add the Equipment Maintenance window to VBA, along with the controls we created. In addition, we will need to have our lookup button call the Customer Lookup window in the SmartList dictionary. This means that we will also need to add this window to the VBA project.
To add the Equipment Maintenance window to VBA follow these instructions:
1) Open the Equipment Maintenance window. Go to Cards > Field Service > Equipment
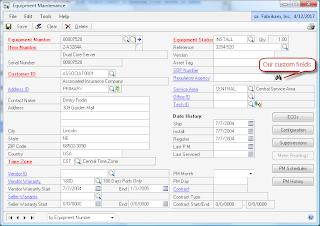
* Click image to enlarge - Equipment Maintenance window
2) From the window Tools menu, select Customize > Add Current Window to Visual Basic. I am also a fan of shortcuts, so you could have also pressed CTRL + F11 on your keyboard. Now you have added your window to VBA... very simple!
3) To add the fields, we will press Shift + F11 on your keyboard. The system will change the mouse cursor to a visual cue that will indicate that the Add Fields mode is on. Click on the following controls:
a) The zoom button - Remember, this control is not visible, but will be added to VBA by clicking over the prompt.
b) The '(L) Regulatory Agency' field. This control is the textbox next to the prompt
c) The lookup button - The button with the binoculars.
Now, turn off the Add Fields visual cue by pressing Shift + F11 on your keyboard once more.
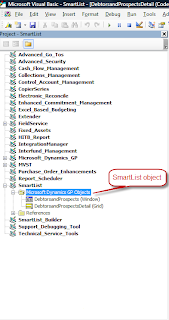
To verify you have completed this step successfully, you can open the Visual Basic Editor. Press ALT + F11 on your keyboard. Locate the FieldService project in the Project Explorer in the left pane of the window.

* Click on the image to enlarge
Highlight the Equipment Maintenance object as indicated above, now click in the drop-down list contiguous to the Project Explorer to verify all your objects are present.

* Click on image to enlarge
Don't worry, if you are missing any of the fields, you can repeat step 3 until the results are the same as shown on the figure above.
NOTE: Dynamics GP is also open with the VBA Editor. You can close the editor to continue with the next steps.
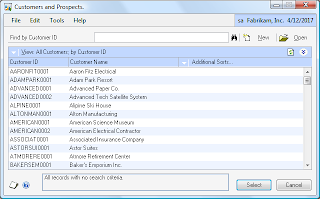
4) Now we will add the Customer Lookup window. Click on the lookup button next to the Customer ID field in the Equipment Maintenance window.
5) Press CTRL + F11 on your keyboard to add the window to VBA
6) To add the fields, we will press Shift + F11 on your keyboard. The system will change the mouse cursor to the visual cue that will indicate that the Add Fields mode is on. Click on the following controls:
a) Select Button
b) Customer ID -- in the scrolling window
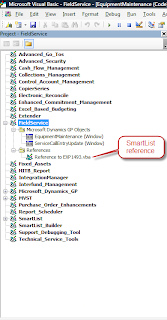
To verify you have completed this step successfully, you can open the Visual Basic Editor. Press ALT + F11 on your keyboard. Locate the SmartList project in the Project Explorer in the left pane of the window.
* Click on image to enlarge
You can repeat the same procedure as above to verify the Select button has been added. For the CustomerNumber field, double-click on the Grid object in the project explorer then check the drop-down.
SETTING UP CROSS-DICTIONARY REFERENCES
Because the Customer and Prospects Lookup is located in the SmartList project, it is not accessible directly by the FieldService project. We will need to make this happen in order to be able to call the lookup window. In order to do so, we have to setup a reference to the SmartList project in the FieldService project.
1) In the Project Explorer, locate the FieldService project and highlight
2) From the Microsoft Visual Basic editor's Tools menu, select References...
3) In the References window, locate SmartList, then add a checkmark to indicate that objects in this project will be referenced. Use the Priority buttons (Up) to give the SmartList objects a higher priority. This will help improve your customization's performance.
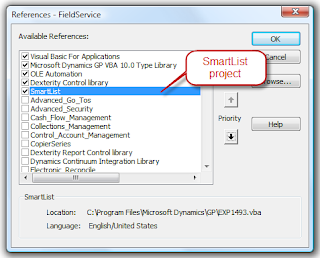
* Click on image to enlarge
Now you will see a References folder added to your FieldService project in the Project Explorer. This folder will contain a reference to the EXP1493.vba file.
* Click on image to enlarge
Good work so far!
ADDING CODE WITH THE VBA EDITOR
We will add our first line of VBA code now. We will make the lookup button open the Customer Lookup window.
1) Click on the FieldService project in the Project Explorer window and highlight the EquipmentMaintenance(Window) object.
2) Click on the drop-down list next to the Project Explorer and select the LookupButton object. By default, VBA will create a BeforeUserChanged event subroutine template for our code. We will stick to this and add the following code:
LookupButton_BeforeUserChanged()
3) Compile your code by clicking selecting Debug > Compile FieldService.
4) Save your code by clicking on the Save button on the toolbar menu.
NOTE: This workshop is not intended to go into code detail, but rather to demonstrate the techniques available to the user and developer communities.
Testing the code
1) Return to Dynamics GP and open the Equipment Maintenance window
2) Click the Lookup Button added, next to the Regulatory Agency field.
Our final installment on Friday will present lots and lots of code. We will explain some of it, you will research some of it and remember, you can always post back with your feedback.
Downloads
v10 - WorkshopDay2.package - Contains all topics covered during day 1 and day 2 of this workshop.
Until next post!
MG.-
Mariano Gomez, MVP
Maximum Global Business, LLC
http://www.maximumglobalbusiness.com/
Today we will dive into adding objects (windows and fields) to VBA. This will set us one step closer to our final project. We will also be adding our first lines of code. Today's workshop will cover the following topics:
- Adding windows and fields to VBA
- Setting up cross-dictionary references with VBA
- Adding code with the VBA code editor
In the previous session we added some extra controls (a field, a lookup button, and a zoom button) to the Equipment Maintenance window. We also explored linking the field to its prompt and the lookup to its field. This is especially important if we want to provide some extra capabilities to our project. After all, you never know who will customize our customization. For more information check my previous article "The importance of linking your fields to their prompts.
ADDING WINDOWS AND FIELDS TO VBA
For our project, we will need to add the Equipment Maintenance window to VBA, along with the controls we created. In addition, we will need to have our lookup button call the Customer Lookup window in the SmartList dictionary. This means that we will also need to add this window to the VBA project.
To add the Equipment Maintenance window to VBA follow these instructions:
1) Open the Equipment Maintenance window. Go to Cards > Field Service > Equipment

* Click image to enlarge - Equipment Maintenance window
2) From the window Tools menu, select Customize > Add Current Window to Visual Basic. I am also a fan of shortcuts, so you could have also pressed CTRL + F11 on your keyboard. Now you have added your window to VBA... very simple!
3) To add the fields, we will press Shift + F11 on your keyboard. The system will change the mouse cursor to a visual cue that will indicate that the Add Fields mode is on. Click on the following controls:
a) The zoom button - Remember, this control is not visible, but will be added to VBA by clicking over the prompt.
b) The '(L) Regulatory Agency' field. This control is the textbox next to the prompt
c) The lookup button - The button with the binoculars.
Now, turn off the Add Fields visual cue by pressing Shift + F11 on your keyboard once more.
To verify you have completed this step successfully, you can open the Visual Basic Editor. Press ALT + F11 on your keyboard. Locate the FieldService project in the Project Explorer in the left pane of the window.

* Click on the image to enlarge
Highlight the Equipment Maintenance object as indicated above, now click in the drop-down list contiguous to the Project Explorer to verify all your objects are present.

* Click on image to enlarge
Don't worry, if you are missing any of the fields, you can repeat step 3 until the results are the same as shown on the figure above.
NOTE: Dynamics GP is also open with the VBA Editor. You can close the editor to continue with the next steps.
4) Now we will add the Customer Lookup window. Click on the lookup button next to the Customer ID field in the Equipment Maintenance window.

5) Press CTRL + F11 on your keyboard to add the window to VBA
6) To add the fields, we will press Shift + F11 on your keyboard. The system will change the mouse cursor to the visual cue that will indicate that the Add Fields mode is on. Click on the following controls:
a) Select Button
b) Customer ID -- in the scrolling window
To verify you have completed this step successfully, you can open the Visual Basic Editor. Press ALT + F11 on your keyboard. Locate the SmartList project in the Project Explorer in the left pane of the window.

* Click on image to enlarge
You can repeat the same procedure as above to verify the Select button has been added. For the CustomerNumber field, double-click on the Grid object in the project explorer then check the drop-down.
SETTING UP CROSS-DICTIONARY REFERENCES
Because the Customer and Prospects Lookup is located in the SmartList project, it is not accessible directly by the FieldService project. We will need to make this happen in order to be able to call the lookup window. In order to do so, we have to setup a reference to the SmartList project in the FieldService project.
1) In the Project Explorer, locate the FieldService project and highlight
2) From the Microsoft Visual Basic editor's Tools menu, select References...
3) In the References window, locate SmartList, then add a checkmark to indicate that objects in this project will be referenced. Use the Priority buttons (Up) to give the SmartList objects a higher priority. This will help improve your customization's performance.

* Click on image to enlarge
Now you will see a References folder added to your FieldService project in the Project Explorer. This folder will contain a reference to the EXP1493.vba file.

* Click on image to enlarge
Good work so far!
ADDING CODE WITH THE VBA EDITOR
We will add our first line of VBA code now. We will make the lookup button open the Customer Lookup window.
1) Click on the FieldService project in the Project Explorer window and highlight the EquipmentMaintenance(Window) object.
2) Click on the drop-down list next to the Project Explorer and select the LookupButton object. By default, VBA will create a BeforeUserChanged event subroutine template for our code. We will stick to this and add the following code:
LookupButton_BeforeUserChanged()
' Lookup button - BeforeUserChanged code
' Modifier with VBA Workshop - Day 2
Private Sub LookupButton_BeforeUserChanged(KeepFocus As Boolean, CancelLogic As Boolean)
    SmartList.DebtorsandProspects.Open
End Sub
3) Compile your code by clicking selecting Debug > Compile FieldService.
4) Save your code by clicking on the Save button on the toolbar menu.
NOTE: This workshop is not intended to go into code detail, but rather to demonstrate the techniques available to the user and developer communities.
Testing the code
1) Return to Dynamics GP and open the Equipment Maintenance window
2) Click the Lookup Button added, next to the Regulatory Agency field.
Our final installment on Friday will present lots and lots of code. We will explain some of it, you will research some of it and remember, you can always post back with your feedback.
Downloads
v10 - WorkshopDay2.package - Contains all topics covered during day 1 and day 2 of this workshop.
Until next post!
MG.-
Mariano Gomez, MVP
Maximum Global Business, LLC
http://www.maximumglobalbusiness.com/


Comments
Using the VBA code, how to find which lookup window is activated in GP (whether the standard lookup or the smartlist lookup)?
Thanks,
Prakash
The sample code for Day 3 provides a better insight as to how you would identify which window is open. The theory goes something like this: if you put a script on both the alternate modified lookup window (used by SmartList) and the standard GP lookup you shouldn't really have to worry about which one loads because that would be determined by the user's security settings -- but the code would need to reside on both to react to the lookup event.
MG.-
Mariano Gomez, MVP
Maximum Global Business, LLC
http://www.maximumglobalbusiness.com
This workshop is very helpful thank you!
I'm trying to create a custom lookup instead of the customer lookup as in your example. I used extender to create a form (Categories) with the ID field named Category and I then I marked the option "add to lookup list". I launched this form and added a few records (category 1, category 2, category 3 and category 4).
I created another form (TEST) just so that I could set the format of one field to be a lookup and I specified the lookup to be the lookup that is created by marking the option "add to lookup list" on the Categories form setup. I then launched that form (TEST) and clicked the the lookup field in order to view the Categories Lookup window so I could add it to the VB editor as you did with the Customer lookup.
The problem is that when I click the push button added in your workshop instructions, the lookup window opens but it's blank. So rather than having a window title of Categories Lookup it shows ~internal~ and the column doesn't list the ID field but rather has a heading of a0 and scroll window is blank instead of showing "category 1, category 2 etc...) I'm assuming this happens because it's an extender lookup and is depending on information from extender to know what to populate in the lookup window.
Since this attempt didn't work I'm wondering if you have any suggestions on a method of creating a custom lookup that I could add to the equipment maintenance window?
Thanks!
Remember that Extender lookups are simply template windows. The reason you are not getting any data back is because you would have to write your own code to populate these windows - in Extender, this is done via Dexterity triggers.