Workshop Day 1- Adding custom fields and lookups to a window
Overview
Welcome to the first installment of this 3-day workshop! The workshop will be conducted today Monday, Wednesday, and Friday. The format is simple: get your laptop or PC with Dynamics GP 10.0 and follow the instructions below. Try to complete each section of the workshop and post your questions. That's it!
Today's workshop will focus on the essentials of Modifier by working with the Equipment Maintenance window in the Field Service series. The topics to be covered are as follow:
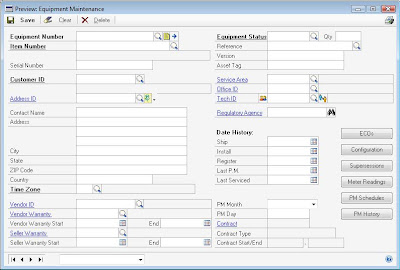
The Equipment Maitenance window will require a new field, the Regulatory Entity, and a new Lookup button that will call our Customer Lookup window.
1) Open the Equipment Maintenance window. Go to Cards > Field Service > Equipment.
2) From Tools menu, select Customize, then choose Modify Current Window to open Modifier
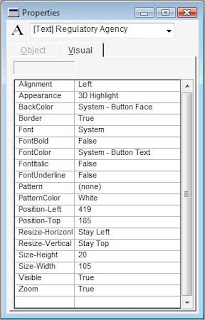
3) Click the Static Text tool on the Toolbox window to add the prompt Regulatory Agency. Change the properties for the static text as follows:
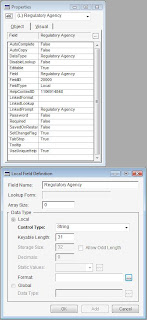
4) Click the String tool on the Toolbox window to add a field place holder for the value returned by the lookup. Set the field properties as follows:
5) Link the field to its prompt. Click on the Tools menu and select Link Prompt. When the visual cue is activated, click on the '(L) Regulatory Agency' field dragging to the prompt.
6) Add the lookup. Click on the Push Button control in the Toolbox window, then click next to the '(L) Regulatory Agency' field. Arrange the push button to be of the same size of other lookup windows on the screen.
7) Change the button properties as follows:
a) Double-click on the Field property under the Object tab in the Properties window. Change the field name to Lookup Button.
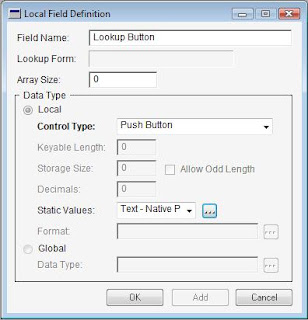
b) Select Text-Native Picture from the Static Values drop-down list. Click on the ellipses button next to the DDL to open the Button Items window. Click on the ellipses button next to the Up property and select the VS_Binoculars image from the list.
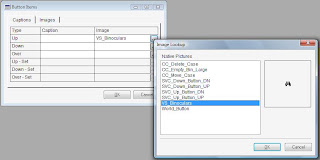
NOTE: If you want the classic lookup image, you will need to add it to the Field Service modified forms picture library by copying and pasting an image from the Dynamics dictionary.
c) Click Ok as many times to return to the modified window layout screen.
8) Link the lookup to the field. Click on the Tools menu and choose Link Lookup. Click on the lookup button dragging to the '(L) Regulatory Agency' field. The final window result is as follows (Layout > Preview):
9) Return to Microsoft Dynamics GP and grant security to the modified window. Save all changes to your modified window on the way out.
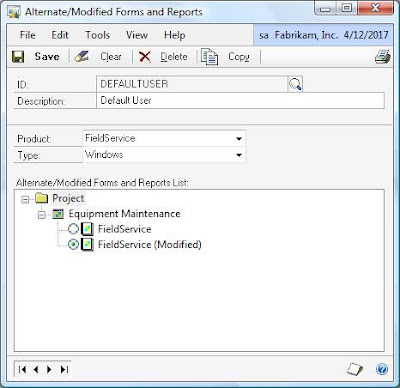
10) Verify the window displays as intended. You can go back to Modifier to make any adjustments for field alignment or layout as needed. Our series continues Wednesday with adding all the objects and elements needed for our VBA project.
On your own
Add the Zoom Button.
1) Return to Modifier
2) Click to add a Push Button control.
3) Position the push button over the Regulatory Agency prompt
4) Change the push button properties as follow:
a) Visible = False
b) Zoom = True
5) Verify the size and length of the push button and alignment with the prompt
6) Return to Dynamics GP and test the form by going to Cards > Field Service > Equipment
Downloads
v10 - EquipmentMaintenance.package. Contains the changes made to the equipment maintenance window made with Modifier (does not contain zoom button, I will post a download for this tomorrow).
Until next post!
MG.-
Mariano Gomez, MIS, MCP, MVP
Maximum Global Business, LLC
http://www.maximumglobalbusiness.com/
Welcome to the first installment of this 3-day workshop! The workshop will be conducted today Monday, Wednesday, and Friday. The format is simple: get your laptop or PC with Dynamics GP 10.0 and follow the instructions below. Try to complete each section of the workshop and post your questions. That's it!
Today's workshop will focus on the essentials of Modifier by working with the Equipment Maintenance window in the Field Service series. The topics to be covered are as follow:
- Adding a window to Modifier
- Adding extra fields and controls to a modified window
- Working with field properties
- Linking fields to prompts
- Linking lookups to fields
- Granting security to modified windows
The Equipment Maitenance window will require a new field, the Regulatory Entity, and a new Lookup button that will call our Customer Lookup window.
1) Open the Equipment Maintenance window. Go to Cards > Field Service > Equipment.
2) From Tools menu, select Customize, then choose Modify Current Window to open Modifier
3) Click the Static Text tool on the Toolbox window to add the prompt Regulatory Agency. Change the properties for the static text as follows:

4) Click the String tool on the Toolbox window to add a field place holder for the value returned by the lookup. Set the field properties as follows:

5) Link the field to its prompt. Click on the Tools menu and select Link Prompt. When the visual cue is activated, click on the '(L) Regulatory Agency' field dragging to the prompt.
6) Add the lookup. Click on the Push Button control in the Toolbox window, then click next to the '(L) Regulatory Agency' field. Arrange the push button to be of the same size of other lookup windows on the screen.
7) Change the button properties as follows:
a) Double-click on the Field property under the Object tab in the Properties window. Change the field name to Lookup Button.

b) Select Text-Native Picture from the Static Values drop-down list. Click on the ellipses button next to the DDL to open the Button Items window. Click on the ellipses button next to the Up property and select the VS_Binoculars image from the list.

NOTE: If you want the classic lookup image, you will need to add it to the Field Service modified forms picture library by copying and pasting an image from the Dynamics dictionary.
c) Click Ok as many times to return to the modified window layout screen.
8) Link the lookup to the field. Click on the Tools menu and choose Link Lookup. Click on the lookup button dragging to the '(L) Regulatory Agency' field. The final window result is as follows (Layout > Preview):

9) Return to Microsoft Dynamics GP and grant security to the modified window. Save all changes to your modified window on the way out.

10) Verify the window displays as intended. You can go back to Modifier to make any adjustments for field alignment or layout as needed. Our series continues Wednesday with adding all the objects and elements needed for our VBA project.
On your own
Add the Zoom Button.
1) Return to Modifier
2) Click to add a Push Button control.
3) Position the push button over the Regulatory Agency prompt
4) Change the push button properties as follow:
a) Visible = False
b) Zoom = True
5) Verify the size and length of the push button and alignment with the prompt
6) Return to Dynamics GP and test the form by going to Cards > Field Service > Equipment
Downloads
v10 - EquipmentMaintenance.package. Contains the changes made to the equipment maintenance window made with Modifier (does not contain zoom button, I will post a download for this tomorrow).
Until next post!
MG.-
Mariano Gomez, MIS, MCP, MVP
Maximum Global Business, LLC
http://www.maximumglobalbusiness.com/
Comments
MG.-
Take a look at the samples provided under the Learning Resources page of this blog, for the Development session presented at any of the Convergence events.
MG.-
I followed your directions and they were great, how do I tie my text box to the database table CM20300?