Building Microsoft Dexterity Cross-Dictionary Applications with GP Power Tools - Part 1/2
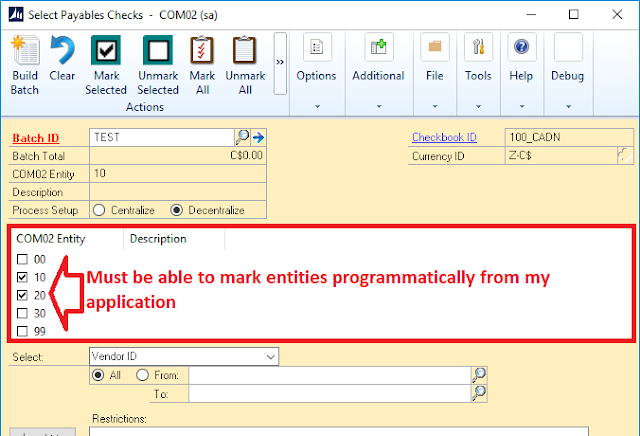
As part of an existing project I am currently working on, we need the ability to programmatically select the entities with the Binary Steam's Multi-Entity Management Select Payables Checks alternate window, when running a Decentralize process. In our software, users have the ability to pre-configure and save those settings, and our code needs to be able to set the values within the entity list view and drive the processing by clicking the Build Batch button.
Dexterity developers are constantly challenged by the difficulties of creating cross-dictionary code to interact with resource objects in third-party dictionaries, so I thought I would show some really cool features available in GP Power Tools, written by Microsoft MVP, David Musgrave, over at Winthrop Development Consultants, that can help developers test and package their cross-dictionary code more effectively, and without second guessing whether it will work once deployed.
But the pass-through code that I need from my Dexterity application needs to parametrize the entity ID since I will be supplying these values from a table to be marked by the code you saw above. Tomorrow I will show you how to leverage both the SQL Execute Setup and the Parameters Lists features in GP Power Tools to take the headache away from this process.
Until next post!
MG.-
Mariano Gomez, MVP

 |
| Binary Stream's Select Payables Checks alternate window |
Dexterity developers are constantly challenged by the difficulties of creating cross-dictionary code to interact with resource objects in third-party dictionaries, so I thought I would show some really cool features available in GP Power Tools, written by Microsoft MVP, David Musgrave, over at Winthrop Development Consultants, that can help developers test and package their cross-dictionary code more effectively, and without second guessing whether it will work once deployed.
Resource Information window
One of the first challenges when working with third-party dictionaries is to be able to identify the name of the resource we want to target. In this particular case, the resource in question is a list view on the Select Payables Checks alternate window.
To identify this resource, we will use the Resource Information window in GP Power Tools. Follow these steps:
1. Click on Options > Resource and Security > Resource Information
 |
| Resource Information option |
2. In the Resource Information window, click the Show currently selected Window and Field Information check mark.
 |
| Resource Information window |
By selecting this option, Power Tools will now "listen" for any new window that is open and as you click through the fields on the window, it will identify what you are clicking through and display the corresponding field information.
3) Open the Select Checks window (Purchasing > Transactions > Select Checks) and navigate to the entity List View.
 |
| Select Payables Checks and Resource Information windows side-by-side |
Now, you can see that the List View object I am interested in is called '(L) MainList'.
Runtime Execute Setup
Since we now know the name of the List View object, we can proceed to create some cross-dictionary code that will allow us to navigate the list and set a state image when the entity is value is, tentatively for this example, "20". As a general rule, it is good to add some extra code to capture the index of the state images associated to objects such as list views and tree views.
For this example, the checked image index value is 2, which I have previously researched to be the correct value. Here are the steps to setup the script.
1. Open the Runtime Execute Setup window. Go to Options > Scripting > Runtime Execute Setup.
 |
| Runtime Execute Setup |
2. For this script, we will setup a Script ID, which we will call MEM_LV and for script name we will set Multi-Entity Management List View. We will want this script to execute in the context of the Multi-Entity Management dictionary, as shown below.
 |
| Runtime Execute Setup |
Runtime Execute has the ability to setup scripts that can be rolled out to end-users (Published to Executer Window checkmark) or grouped in projects for easy access and export (similar to a Solution is Visual Studio). We can also drive scripts via custom parameters, but I will leave this topic for the second part of this article.
3. Now that we have filled out the required header information, we just need to add some sanScript code that will change the image state to a checkmark for entity "20". That code looks something like this:
 |
| Runtime Execute Setup |
Note that we are running the change script on the List View object, however, this particular List View does not have any code running behind the change event. It's always good to manually perform a task in the window in question for the object you are interested in, capturing a script log in the process to see if there's any specific code you need to worry about.
We can now test this code.
But the pass-through code that I need from my Dexterity application needs to parametrize the entity ID since I will be supplying these values from a table to be marked by the code you saw above. Tomorrow I will show you how to leverage both the SQL Execute Setup and the Parameters Lists features in GP Power Tools to take the headache away from this process.
Until next post!
MG.-
Mariano Gomez, MVP
Comments